DIY STRAP EDGE REPAIR KIT
DIY Strap Edge Repair Kit
Every year thousands of handbags are discarded because the edging on the straps is deteriorated. What if there was a way to make them look new again?
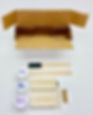
Handbag Edge and Leather Repair has developed an inexpensive do-it-yourself strap edge repair kit with three easy steps to revitalize your damaged handbag strap. We have included black and brown colors, an application tool, razor blade, and sanding stick.

DIY Strap Edge Repair Kit Instructions
1. STRAP PREPARATION
Using the provided razor blade trim away a small amount of the old edging to taper into the area that needs repair. Do this on both sides of the repair. Next trim away any old glue or other material which could cause a lump on the repair. Threads can easily be burned away using a lighter. We now have a flat prep surface with tapered edges on both sides of the damaged area.
2. APPLY PRIMER
Slotted woodblocks are included to hold a strap in an upright position keeping the strap upright is important for a solid good-looking repair. Longer straps may require using two blocks. Next we will apply the clear primer using a piece of the stir stick, give the primer a good stir before using. The application tool has been marked for the proper amount of primer, now dip the application tool up to the line, allowing excess primer to drip off. Apply a thin coat of primer to the damaged area and allow it to dry for about two hours. It is important to build up the primer in thin layers using about three applications to ensure a strong repair. This also prevents color bleed when you apply the top coat of brown or black. The primer is water-soluble and any excess drips can be cleaned up using a damp q-tip. After the primer has dried smooth out any lumps or imperfections using the sanding stick. It’s important to sand outward near the edges of the repair to prevent separating the primer from the strap, also smooth up the sides to create a nice rounded feathered surface. Most straps will require three applications of primer. Here’s a fully prime strap, as you can see it is fully filled and flush from one edge to the other. When you run your fingers across the surface the primer and old color should be level, occasionally a fourth application is necessary.
3. APPLY COLOR
Slotted woodblocks are included to hold a strap in an upright position keeping the strap upright is important for a solid good-looking repair. Longer straps may require using two blocks. Next we will apply the clear primer using a piece of the stir stick, give the primer a good stir before using. The application tool has been marked for the proper amount of primer, now dip the application tool up to the line, allowing excess primer to drip off. Apply a thin coat of primer to the damaged area and allow it to dry for about two hours. It is important to build up the primer in thin layers using about three applications to ensure a strong repair. This also prevents color bleed when you apply the top coat of brown or black. The primer is water-soluble and any excess drips can be cleaned up using a damp q-tip. Before applying color it is necessary to rough up a bit of the original color to allow the new coloring to adhere this helps create a seamless transition to the repair. For this repair, we’ll be using the brown topcoat, as mentioned before, you should stir the material before application. Color is applied using the same method as the primer, apply a thin coat and feather it in just as before. The topcoat should be allowed to dry for about two hours and two to three applications of topcoat is generally sufficient. Before applying the next coat, lightly sand to prep the surface taking care not to take it back down to the primer. If you see a noticeable difference between the old and new topcoat colors simply rough up the old surface and apply a new layer of color to the entire strap. As always use the blocks to keep the strap upright for proper application. For matching colors one coat is generally all that is needed. So this should be done on the final top coat application. For proper hardening, you should allow the last coat to dry for at least eight hours before using the handbag. It is really that easy to repair your damaged handbag strap.